Sunday, January 29, 2017

Jenkins and GIT – Shell script remote execution


In this article we are going to see how to run shell script on the remote machine using Jenkins and GIT.

The BASH script to restart the service is hosted on the GIT which is a central repository. The Jenkins interact with GIT, download the BASH script onto the target computer and executes.

1) Login to the Jenkins console. Create a new project “Start-Service”.


Make the below configurations to the project.

2) In the General tab. give the project name “Start-Service”.


3) To provide inputs at the run time. Choose check the box “This project is parameterized”.


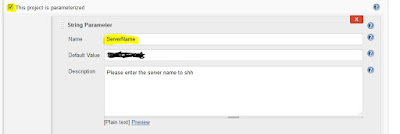
4)  I have a BASH script uploaded to my GIT repository to start a service on Redhat server.


5) In the Build Environment section, we update the shell execution. Dropdown the Add build step and select Execute shell.


6) Now comes the logic portion for integrating Jenkins with GIT.


The Jenkins build will download the script to start the service to the Jenkins server using git clone and execute on the target server. Here in this example the target server I used have the password less authentication set from the Jenkins server.

7) Run the Jenkins build.


Provide the inputs target server name, user name and service. Click Build.

8) Validate: go to build history and validate the Jenkins build log.


Monday, January 23, 2017

Custom presentation on VMware vRealize Orchestrator workflow


In this article we are going to look at custom presentation of VMware vRealize Orchestrator workflow. Here in this example we would concentrate on the presentation portion rather than the  workflow execution.

Let’s say we have to create a workflow for VM deployment and the presentation should have the options for IP configurations based on the type selected “Static” or “DHCP”.
Below inputs are required to deploy the virtual machine.

  
Input Name
Type
Description
computerName
String
Enter the virtual machine name to create
numCpu
Number
Enter the number of CPUs required for the VM
ram
Number
Enter the ram(GB) required for VM
initStorage
Number
Enter the Initial Storage(GB) required for VM
Dhcp
String
Choose DHCP "Yes" or "No"
IpAddress
String
Enter the IP Address
defaultGateway
String
Enter the Default Gateway
subnetMask
String
Enter the Subnet Mask

Now let’s dive into the workflow.
Step 1) Login to VRO console and create a workflow and go to inputs tab and choose add parameter to add a new input parameter.


Step 2) Click on the new input parameter and change the attribute name to “computerName” and click Ok.


Step 3) Click on the type for the input parameter and choose the required data type. Then click accept to proceed. Here in this example I do not change the data type as the required type is string.


Step 4) Repeat step 1 to step 3 for remaining input parameters and choose the appropriate data type. The workflow input session look as below.


Step 5) now move to the presentation tab of the work flow. Now that we see all input parameter define earlier is visible on presentation tab.


Step 6) Select the first parameter “computerName“ and provide appropriate description.


Step 7) Select the second parameter “numCPU”. Enter the description and choose property as predefined answers. Then click on not set to enter predefined values.


Step 8) Select the parameter RAM and give predefined values.

Step 9) for the net input storage. Give default value as parameter.

Step 10) for “Dhcp” input parameter give the predefined values “yes” or “no”.
  
Step 11) for the next three input parameters ( ipAddress, defaultGateway and subnetMask ). 


Here in this step there are three properties to be observers. There three properties are binded to the #Dhcp input parameter value. If the DHCP input value is yes then these three properties are set to hide. Else the remaining input parameters will be visible in the presentation during workflow execution.

Now let’s run the work flow and see how the presentation looks.


Tuesday, January 17, 2017

Working with Process, CPU and Memory in Linux


# ps aux  => List all the processes

# pkill <<process_name>>   => will find all process with the name mentioned and kill

# kill –l  =>  Will list all available signals


# kill -9 <<PID>>   =>  Kills the process corresponding to the PID mentioned

# pkill –t <<ptty_id>>  => ptty_id can be found using the command w. This will return all logged in users and their terminal Ids

# pkill  -u  <<user_name>>  <<process_name>>   => will kill the process specified for the specified user


Working with job


# job  =>  this will list the background jobs of the user with the number

# kill –SIGSTOP  %1   =>  Will kill the process  %1 is the process number

# job  => Will display the job status as stopped


Vi Editor

Keys tips for using VI editor

yy        => Copy the entire line
P          => paste above the cursor
p          => paste below the cursor
dd       => Cut the entire line
ndd     => Cut n number of lines starting from cursor location
G         => Go bottom or last line of the file
A         => End of the line where cursor is located


:/serachword                                              => will search for the word
:/set nu                                                      => set numbers to the file
:%s/wordToFind/WordToReplace              => find and replace


Linux User Adminstration


There are two type of users in Linux. They are System users and Normal Users. Each user will have a unique ID called UID.
User Type
UID Range
System Users
0 to 999
Normal User
1,000 to 60,000


The user information is stored in the following files.
/etc/passwd – User information is stored
/etc/shadow – password information of the users is stored in this file
Let us discuss more about each file.

In /etc/passwd file, the user details are present in the below format.


Here UID and GID are auto generated by the system. Every user will have a unique user ID (UID) and group ID (GID).
The default home directory in Linux is /home/<username>.


In /etc/shadow file, the encrypted user password details are present.


There are few tools like DES (64 bits), MD5 (128 bits), SHA (512 bits) which will encrypt the password in linux. In RHEL 7, SHA is the default tool.

The tool used to encrypt the password of a specific user can be found using the command

passwd –S <username>

the output looks like the below.


Below are the basic command for user administration.

Create a user:  useradd <username>

change the user password: passwd <username>

lock the user account: usermod –L <username>

Verification: The !mark before the encrypted password represents the account is locked.

Now let’s check the usermod command to change each property of /etc/passwd file.
1)      Change the user name: usermod -l <new_name> <old_name>
2)      Change the user ID: usermod –u <new_uid> -o <user_name> (-o is applied when the same UID is used for two users).
3)      Change the comments of a user: usermod –c “<new_comments>” <user_name>
4)      Change the user home directory: usermod -m -d <new_directory_fullpath> <user_name>
   (
here –m to move the current home directory content to new home directory)
the default home directory information can be found in the file /etc/default/useradd


5)      Delete a user including home directory and mail spool

userdel –r <<User_Name>>


6)      Change the user login shell: chsh –s <new_shell_name> <user_name>

The available shells on the linux box can be found at /etc/shells


Password information:

chage –l  <<username>>


Change the maximum days of the passwd expiry.


Groups:

The groups information is found in the fail /etc/group

create a new group
# groupadd <<New_Group_Name>>

Append a secondary group to the user

# usermod –aG <<Secondary_Group>> User_Name

List all groups a user belongs to. Here
testacl is the user


Set-GID for directories:

By doing this. The newly created child objects will have the current group of dir1

Top Command in Linux


Top command will give the list of process with nice level, CPU utilization, and memory utilization.

First line contains the uptime, number of users logged in, load average (1min, 5 min, 15 min)


Calculate load on multiple CPU machine.

Step 1) get number of processors from the below file.

cat /proc/cpuinfo | grep “model name” | wc –l


Step 2)     (average load) / (number of processors)


Lines of top command:


Line 1: 
uptime, number of users logged in, load average (1min, 5 min, 15 min)
Line 2:  task information (total, running, sleeping and stopped)
Line 3:  CPU information
Line 4:  Memory information
Line 5:  Swap information

Sort process by Memory usage/CPU

enter shift + m  to sort by memory usage


enter shift + p  to sort by CPU usage


Re-nice a particular process:

Step 1) Before renice the value of PID 12 is 10.


Step 2)
enter r to renice. Then enter new pid (example: 12) when prompted.


 Step 3) provide new nice value and hit enter


Step 4) The nice lave will be set.


Set delay time for refersh

step 1)
type d and enter. It will prompt to give new delay time. Then type new value and hit enter.


Find the full path of command in top result.

Type c and hit enter


Top result with color code

type z